Saturday 27 October 2012

Butterscotch cookies & Raspberry Cupcakes!

I'm over in Germany having some fun girl-time with my Niece and Sister and you guessed it!  Yup, we've done some baking.  We used the excuse to invite a friend and her twins over for a little Afternoon Tea and chose to make Butterscotch Cookies and Raspberry Cupcakes.  Now my Sis likes playing in the kitchen as much as me, but I bet her cupcakes will be better decorated than mine :-)

The Butterscotch Cookie recipe came out of her Good Food Magazine and is super simple.  Its a basic cookie recipe, but with a sneaky addition of some puffed rice breakfast cereal to give them a crunch.  We managed to get hold of some Choco Krispies, so they added a bit more chocolate to the mix - no harm in that!


We also added the chocolate chips into the batter, rather than popping on the top for decoration.  The recipe says it makes 10 cookies (we doubled-up), but you definitely get more than that.  We got 23 from a double batch and they could have been smaller.


We popped them in a Gas Mark 3 oven for 18 minutes or so.  Half-way through they were taken out and banged on the worktop (use a tea-towel in between to save the work-top).  This helps get out some of the air-bubbles and flattens out the cookies. 

Bake until golden brown.  They may still feel soft on top, but they will firm up when cooled.


Sweet, but not overly so, with a nice crunch from the Krispies.

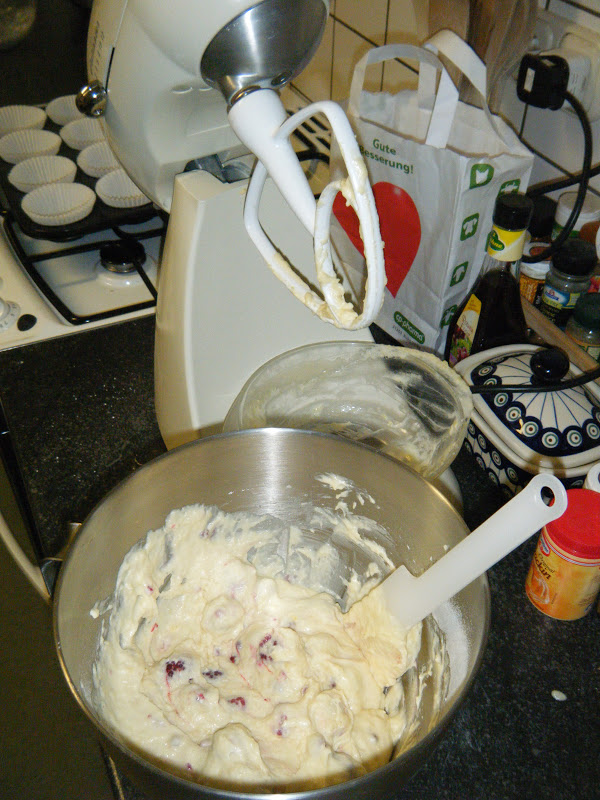
Our little kitchen assistant managed to get hold of my Dr Oetker Cupcake Recipe book and chose the Raspberry Cupcake page to look at.  She was most insistent that this was the page - so the decision was made - Raspberry Cupcakes it was!


Now the fun thing for this recipe, was that the book is all in German.  Thankfully Google Translate came to the rescue and we figured it all out.  But you did have to use a little lateral thinking.  Cupcake rust = bake until golden brown!

A nice simple recipe again, that used frozen raspberries tossed in cornflour (to help prevent them leak juice everywhere and sink to the bottom of the batter) and yogurt in the batter.


All mixed together, the batter was divided between the 12 cupcake cases......


and then baked for around 25 minutes until just golden on top and a skewer came out clean.  Amazingly the raspberries defrosted in the oven and it all baked through perfectly.

The topping consisted of whipping cream, Sahnesteif  (a German cream stiffening agent) and raspberry syrup, which was all whipped up until nice and stiff.


Then we had fun with the piping bag!  My Sis was much more precise!


Whereas I couldn't stop giggling!


The recipe had way too much cream for the amount of cupcakes - you could easily get away with half.  Despite one cupcake missing - well we had to test one to make sure it was alright before icing....................


A fun afternoon baking with my Sis and then a equally nice afternoon consuming the goodies with friends.


So what are you baking?

Tuesday 23 October 2012

Paul Hollywood's Milk Loaf

Just a quickie post to say I tried another bread recipe from Paul Hollywood's 'How to Bake' book the other day.  Its full of yummy bread and sweet delight recipes, but the one I tried this time was a 'Milk Loaf'.

He seems to favour quite a sticky dough for most of his bread recipes, as you seem to use a bit more water than usual.  Also rather than the warm water normally suggested in bread recipes, he opts for cool water.  This takes longer for the initial rise to take place, but in the process provides a fuller flavoured dough.  If, however, you are baking in a cold wintery kitchen, use slightly tepid water.

Butter is melted in warm milk, then mixed in to your flour, yeast, sugar and salt until its a nice sticky dough.  Then tip it out onto an oiled surface and knead for 5 - 10 minutes.


I then popped out for a bit and 3 hours later it was a lovely billowy pillow.......


You then knock it back, shape into a rectangle and pop in a loaf tin...........................


........ so it can then rise for another hour or so until doubled in size.


Then popped in the oven until lovely and coloured.


Buttery rich, with a sweet soft texture it cuts nicely and is lovely with butter and jam when still warm.  It also toasts well, though does become a bit crumbly after a few days.

I've never made a white loaf in a tin before, as I usually prefer a round loaf, but I'm really pleased with how it came out.  Altogether, rather scrummy!


Happy baking!

Saturday 13 October 2012

Treats for the troops #2

Due to popular demand, more batches of biscuits (plus some sweeties!) found themselves flying off to Afghanistan for my BIL to share (hopefully!).  The last lot took only 6 days to arrive and about 6 minutes to be consumed!

These are the final product, plus Colin, who is certainly not camera-shy.  The temptation to post him off as well was quite high!


My first offering were Hazelnut dunking biscuits, from a recipe I found online whilst searching for hazelnut biscuits.  I halved the recipe as it was for 50 biscuits and I was using up store-cupboard ends.  I also used 1 medium egg as its a bit difficult to halve an egg!
Rather than the whole hazelnuts I used 70g chopped roasted hazelnuts + 30g ground hazelnuts to make up the right amount.

All the ingredients, except the hazelnuts, were blended in the Kenwood and I then folded in the hazelnut mix.


Using a teaspoon as guide I made about 24 little balls which were rolled and then flattened slightly with the palm of my hand and placed on a lined baking sheet.


The recipe didn't stipulate whether to use a fan or static oven so I placed the tray in a 180c fan oven and baked in two batches to get a more even bake.  First batch for 9-10 minutes( I opened the oven to check them, so lost some heat).  Second batch for 8 minutes 


They are cooked to a light golden colour and as you can see are really quite delicious!

My second offering were a batch of Jo's Peanut butter & choc chip cookies, which I had made and blogged about before and added an update here.

They are a really quick and simple cookie to make and extremely tasty.


This time I baked them in a 180 fan oven.  First batch for 8 minutes + 2 minutes.  Large teaspoon size.  Second batch for 9 minutes

All packed up and ready to go..................  Lets hope these make it there as fast! 


Here's a random photo from the garden that made me chuckle this week........................


Its National Baking Week next week, Happy Baking!